3CX multi-tenant omgeving opzetten
3CX verlegt de focus naar installaties vanaf 25 gebruikers. Kleine licenties (zoals 4SC) tellen niet meer mee voor je partnerstatus. Dit kan gevolgen hebben voor je marges, support en commerciële kansen met 3CX.
Wil je toch kleine klanten blijven bedienen?
Overweeg dan de 3CX multi-tenant omgeving: hiermee combineer je meerdere kleine klanten op één platform, zonder dat je partnerstatus eronder lijdt.
Zo zet je een 3CX Multi Tenant omgeving op:
3CX Multi-Company / Multi-Tenant bestellen
Inleiding
- 3CX heeft in V20 update 2 een multi-tenant functie toegevoegd waarmee meerdere bedrijven op een 3CX centrale kan onderbrengen. Ideaal voor MKB bedrijven tot 20 gebruikers die gebruik
- maken van basiscommunicatie functies. Bedrijven kunnen geconfigureerd worden als Department binnen een 3CX centrale.
Voor wie?
- De multi-tenant functie stelt partners in staat om meerdere bedrijven met een gering aantal gebruikers op één 3CX centrale onder te brengen.
Wat doet de Multi-tenant functie?
- Kort gezegd, stelt de 3CX multi-tenant functie u in staat om bedrijven te scheiden via Departments. Elke department is één bedrijf. Schakel je om naar Multi-tenant mode dan worden verschillende
- afdelingen onzichtbaar voor elkaar.
Licenties
- Nu kan je al vanaf een 16SC een Multi Tenant opzetten. In de toekomst is een minimale licentie van 64SC (of 32SC – dit is nog ondewerp van gesprek bij 3CX) vereist.
Licentie Registratie
- De multi-tenant licentiehouder neemt alle verantwoordelijkheid voor klantcommunicatie op zich. Dit zal in de interface worden getoond.
3CX Multi Tenant Bestellen
- Bestel in Flux een 3Cx bundel met minimaal 16SC. Kies je er er voor om een 3CX centrale in te richten voor Multi-tenancy, houd dan rekening met het volgende;
Account
- Let goed op onder welk account de 3CX centrale wordt besteld. Bestellen bij voorkeur onder jouw eigen account (het verhuizen van 3CX tenants naar een andere klantkaart is niet mogelijk).
FQDN
- Kies een algemene FQDN die niet herleidbaar is naar één klant.
Minimaal 16SC+
- Multy-tenancy is mogelijk vanaf 16SC en hoger. Mogelijk zal dit in de toekomst wijzigen naar 32SC of zelfs 64SC.
Digits
- Kies van te voren zorgvuldig het aantal digits dat je wil gaan toepassen. Je kan kiezen voor 3, 4 of 5 digits. Het aantal digits zijn later niet meer uit te wijzigen.
SIP-Trunks
- Kies je voor de 3CX Bundel dan wordt de SIP-Trunk geactiveerd op het klantaccount waar je op bestelt. Het is aan te raden om een SIP-Trunk per klant onder de juiste klantkaart aan te vragen.
- Zo blijven CDR’s en nummers gescheiden.
3CX Multi-Tenant Inrichten
De bestelling is afgerond en er is toegang tot het 3CX Systeem. Doorloop de volgende stappen om een reguliere 3CX centrale om te zetten naar Multi-tenant.
- Voordat de centrale geconfigureerd wordt, is het van belang om Multicompany mode aan te zetten. Dat doe je door te navigeren naar Advanced > ‘Parameters’ -> ‘Custom Parameters’ en daar te zoeken op MULTICOMPANYMODE. Verander de waarde vervolgens naar ‘1’.
- Het aanmaken van verschillende klantomgevingen binnen de Multi-tenant centrale is mogelijk door verschillende Departments aan te maken (Deze kunnen in Multicompany mode niet meer toegekend worden tot alle extensies.
- Het is gebruikelijk in een centrale om met 3-cijferige verkorte nummers te werken. In Multicompany mode levert dit beperkingen op. Het advies is om met ranges van 4-cijferige nummers tewerken per klant om flexibiliteit te kunnen bieden.
- Een bundel wordt automatisch opgeleverd met een inbegrepen SIP-Trunk, maar om onderscheid te kunnen maken qua CDR’s en de financiële afhandeling daarvan, wordt er geadviseerd om voor elke klant op een eigen klantkaart een SIP-Trunk aan te vragen en die later te koppelen aan de Department van de klant.
- FLUX is er niet op ingericht om een Multi-tenant centrale onder een enkel klantaccount financieel te kunnen verdelen over meerdere klanten. Er dient dan handmatig via FLUX op klantaccount een factuurregel te worden toegevoegd voor de facturatie van de bundel.
- 3CX 4SC en 8SC centrales kunnen ook op onderstaande manier worden omgezet naar Multi-tenant. Deze optie wordt niet door 3CX ondersteund!Houd er rekening mee dat zodra MULTICOMPANYMODE uit wordt gezet in de centrale, klanten elkaar onderling per direct kunnen zien! Je zal je getroffen klanten hiervan op de homoeten stellen.
- De System Owner kan meerdere System Owners of System Administrators aanmaken om overkoepelend voor klanten de centrale te beheren.
Klanten aanmaken in een 3CX Multi-tenant centrale
Voor het aanmaken van klanten in de Multi-tenant centrale dienen de volgende stappen gevolgd te worden:
Stel de “Default Department” in
Ga naar "Departments", bewerk de afdeling "Default" en voeg deze systeemextensies toe: *777, *888, *0, *1, en Shared Parking Slots.
Maak een Nieuwe Klant aan
Ga naar "Departments" en kies “+Add”. Geef het een naam, kies een taal en een prompt en stel de extensienummers in die gebruikt zullen worden (bijvoorbeeld 1100-1119 voor gebruikers, 1120-
1125 voor gespreksafhandeling). Door dit zo in te stellen, geldt voor alle gebruikers dat ze dezelfde taal gebruiken in de Department, kunnen de “Group Owners” gebruikers aanmaken binnen de
range 1100-1119 en kan Call Handling ingesteld worden voor de range 1120-1125.
Voeg Shared Parking Slots toe aan de Department
Voeg 2 shared parking spaces toe aan deze nieuwe afdeling. Belangrijk: Shared Parking moet uniek zijn voor elke nieuwe Department die je aanmaakt. Dus als je 2 bedrijven hebt, moet je
bijvoorbeeld aan Bedrijf 1 (SP0 en SP1) geven, en aan Bedrijf 2 (SP2 en SP3), enzovoorts

Maak een nieuwe user aan
Wijs deze toe aan de nieuwe Department: Maak bijvoorbeeld een gebruiker aan, geef hem de rol “Group Owner” en stel het Main Department Membership in zodat deze gebruiker(s) automatisch
wordt aangemaakt en toegewezen aan deze afdeling.
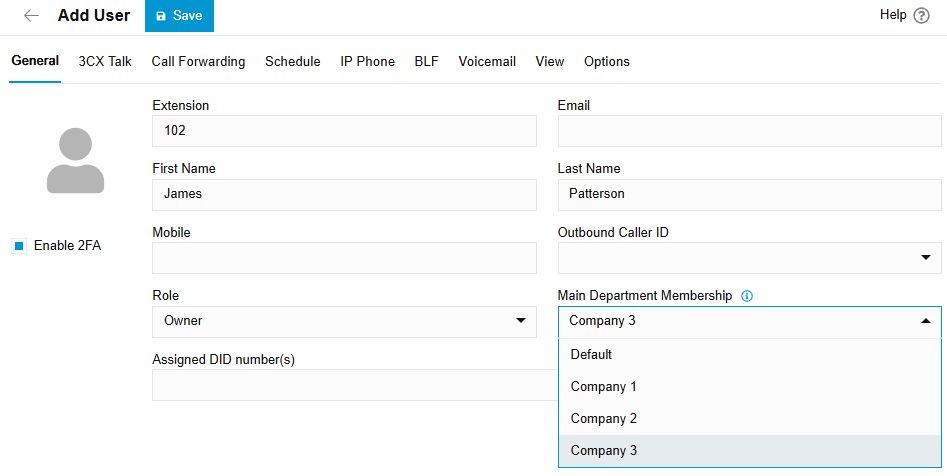
Tip: Als je alle gebruikers in bulk wilt importeren, kun je de importfunctie gebruiken door een rol en Department te definiëren. Zie hieronder een voorbeeld:
102,James,Patterson,,,,,"<role name=""group_owners"" />",Company 3,0,0,jamespatterson,,,,,,,,1,8210986B-9412-497f-AD77-
3A554F4A9BDB,0,024780,1,1,0,0,0,0,0,0,0,0,0,0,0,0,60,,1,,0,0,0,1,,,,,,<PhoneDevice><BLFS/></PhoneDevice>
In de import kun je de volgende rollen opgeven:
Owner: <role name="group_owners" />
Department Admin: <role name="group_admins" />
Manager: <role name="group_managers" />
Receptionist: <role name="group_receptionists" />
User: <role name="group_users" />
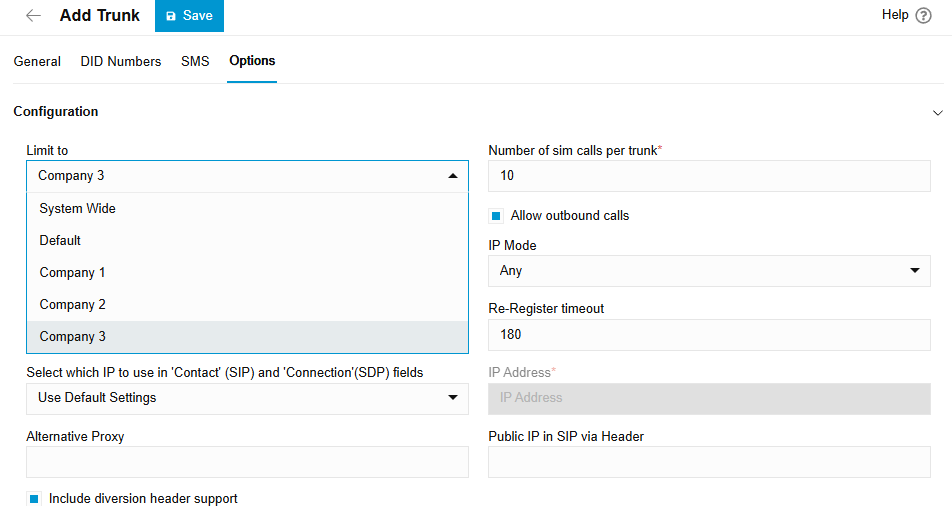
Stel een SIP-Trunk in
In de 3CX bundel wordt automatisch een SIP-Trunk geconfigureerd op het partner account waarop de bundel is besteld. Voor Multi-tenant centrales houdt dit in dat het wenselijk is om elke klant
een eigen SIP-trunk te geven. Houd rekening dat deze separaat aangeschaft dienen te worden.
Voor een Department met nummers: Maak een SIP-Trunk aan voor deze afdeling met niet-toegewezen DID’s. Ga naar “Options” en selecteer de klant waaraan de Trunk gekoppeld moet worden
(“Limit To”). Je kunt dit ook doen voor Call Handling door Ring Groups, Queues en IVR’s aan te maken en direct toe te wijzen aan de Department.
Group Owner
Zodra je elke stap hebt gevolgd, ontvangt de Group Owner een e-mail met uitleg over hoe hij kan inloggen op het systeem. Zodra hij is ingelogd op de Admin Console, kan hij zijn Department
configureren en beheren door: kantooruren en feestdagen in te stellen, gebruikers, Ring Groups en Queues te beheren, en ook nummers toe te wijzen aan elk onderdeel.
Waar rekening mee te houden
In de BLOG over de strategie van 3CX heeft CEO, Nick Galea, extra uitleg gegeven over waar 3CX naar toe wil en welke stappen ze hiervoor nemen. zie link: Strategie 2025
In deze BLOG staan belangrijke zaken die invloed kunnen hebben op de strategie en de markt van ICT/IT Partners.
Waar extra focus op wordt gelegd is dat 3CX zich focust op MKB+ en Enterprise klanten. De verschuiving van Focus is afgelopen jaren ingezet. de 3CX 8SC/4SC Free licenties zijn verder aanbanden gelegd en gaan verdwijnen. De omzet van 4SC draagt sinds dit jaar niet meer mee in de opbouw van de partnerstatus en de kortingen op licenties die hieraan gekoppeld zijn. De kans is groot dat ook 8SC hier in de toekomst ook onder zal vallen.
Door de komst en inzet van multi-tenancy biedt 3CX een alternatief door klanten op een 16SC te plaatsen. Een goede oplossingen die wel een aantal haken en ogen kent waarvan partners op de hoogte moeten zijn. De belangrijkste zaken zijn onderstaand benoemd:
Migratie niet mogelijk
Het is niet mogelijk om bestaande tenants te migreren naar de Multi-tenant oplossing van 3CX.
Alle departments moeten handmatig worden geïmplementeerd
Aantal kanalen
Het aantal kanalen wordt gedeeld met alle klanten in één omgeving. Dit betekent dat een
eindklant de mogelijkheid heeft om meerdere kanalen te gebruiken en daardoor de
bereikbaarheid van andere klanten in de tenant te beïnvloeden.
Het aantal maximaal te gebruiken kanalen per department kan niet worden gelimiteerd.
(interne gesprekken worden ook gezien als één gesprekskanaal)
Propositie
Meerdere eindklanten worden in één centrale geplaatst waarbij elke department gebruik maakt
van shared resources.
CRM
Gebruik van CRM-integratie is niet mogelijk in combinatie met gebruik van departments.
Resources
Shared resources per server, zoals de wachtmuziek, parking slots, phonebook.
Digits / verkorte nummers
Het aantal verkorte nummers dat je nodig hebt per multi-tenant centrale is afhankelijk van het
gebruik.
De meeste 3CX centrales worden geleverd met 3 digits (je belt bijv 202 om je collega te
bereiken).
Als je deze centrale verder wil uitbreiden kan het zijn dat er gekeken moet worden naar een
reeks van 4 of 5 digits. Hier dient op voorhand overna te worden gedacht. Heb je een centrale
op 3 digits ingesteld, is dit op een later moment niet meer aan te passen.
Migratie
Migratie is niet mogelijk. Tenant moet opnieuw worden opgebouwd. Het uploaden van een
back-up is dus niet mogelijk.
AVG
Maak je een fout bij de implementatie van departments kan dit gevolgen hebben voor
klantdata. Datalekken dienen te worden gemeld volgens de Autoriteit Persoonsgegevens via
https://www.autoriteitpersoonsgegevens.nl/.
Facturatie
Een Multi-tenancy centrale wordt als één centrale gefactureerd. Dit betekent dat partner zelf
verantwoordelijk is voor het factureren van het gebruik van de centrale aan de juiste eindklant.
Related Articles
Dienstbeschrijving Flux Cloud - 3CX
De 3CX VoIP telefonieoplossing is een op software gebaseerd telefoonsysteem waarin Vast, Mobiel en UC volledig zijn geïntegreerd waardoor je zelf bepaald wanneer, hoe en via welk device je bereikbaar wilt zijn. Deze oplossing is daarbij gebaseerd op ...Handleiding Cloud Distributie portal FLUX
Beltarieven aanmaken Klik op tariefplan toevoegen Geef het tariefplan een naam en kies wel of geen Onnet facturatie (onderling gratis bellen) De standaard prijzen zijn alle buitenland tarieven, daar kies je een opslagpercentage en een starttarief. ...Xelion 8 hosted tenant bestellen
Nieuwe Tenant aanvragen Wil je een centrale opzetten dan dien je dit te doen door een e-mail te sturen naar info@clouddistributie.nl, wij zetten dan 1 of een aantal lege tenants voor je klaar in de parkmanager. Wil je een tenant uitzetten, kies er ...Veelgestelde vragen (FAQ) — 3CX en Multi‑tenancy
Veelgestelde vragen (FAQ) — 3CX en Multi‑tenancy Deze FAQ bundelt de meest gestelde vragen over 3CX, licenties, FLux 3CX Bundels, SIP Trunks, beheer en de Multi‑tenancy-functionaliteit (Departments) in 3CX V20. Alle antwoorden zijn gebaseerd op de ...Easybell Cloud PBX handleiding
De structuur van de Easybell Cloud PBX Easybell Cloud PBX is een complete, maar overzichtelijke (zakelijke) telefonieoplossing waarmee je eenvoudig en snel je inkomende en uitgaande oproepen kan beheren. De centrale maakt gebruik van zogenaamde ...